Simple Soccer Football Kit
Simple Soccer Football Kit is a soccer starter kit for the Unity game engine. It is primarily aimed at simple, action soccer games.
Download Link:
Simple Soccer Football KitRequires Unity 2019.4.20f1 or higher.
Please note: The soccer kit is no longer in development.
FEATURES
Easy to modify/add:
- Teams. The kit has 8 teams, and the number can be increased (or decreased).
- Players. Numerous player properties are available to edit.
- Playing fields.
- Soccer balls. There are 3 balls available: white soccer ball, bowling ball, beach ball.
- It is also easy to replace the existing art assets with your own.
Also:
- Works on desktop and mobile.
- Support for 2 players (not on mobile).
- Various input methods (e.g. keyboard, mouse, gamepad, accelerometer, touch), and easy to add new ones.
- 3 types of tournaments: Log based (e.g. leagues), single-elimination and world cup.
- Includes the source code.
HOW TO SETUP THE KIT
Please check the manual for setup instructions and upgrade guidelines.
SCREENSHOTS
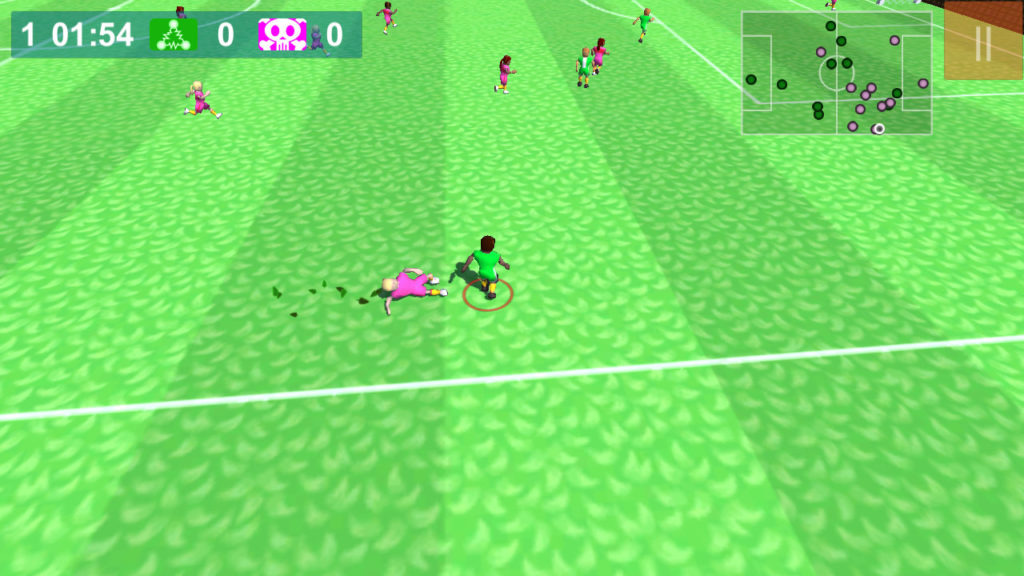
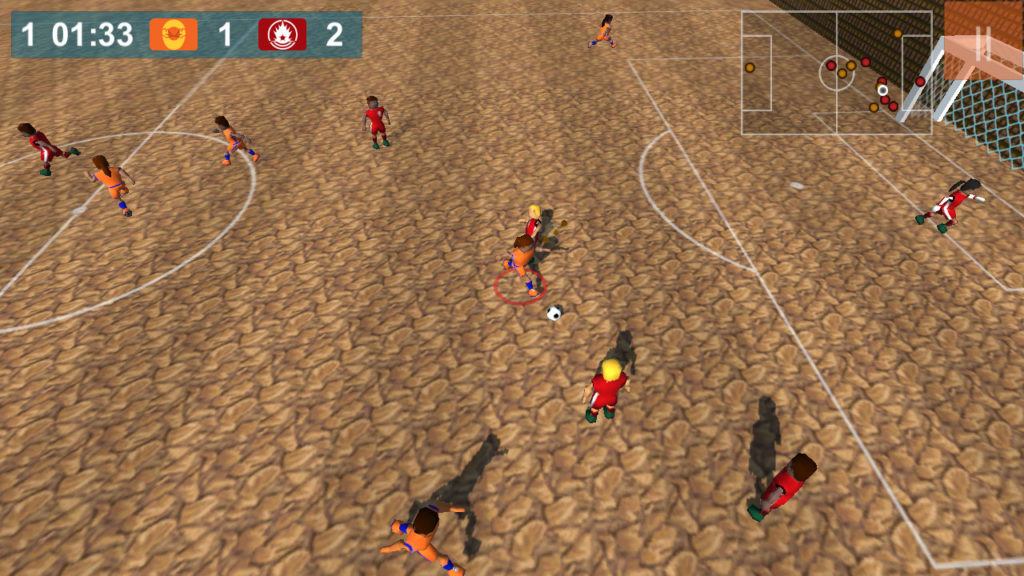
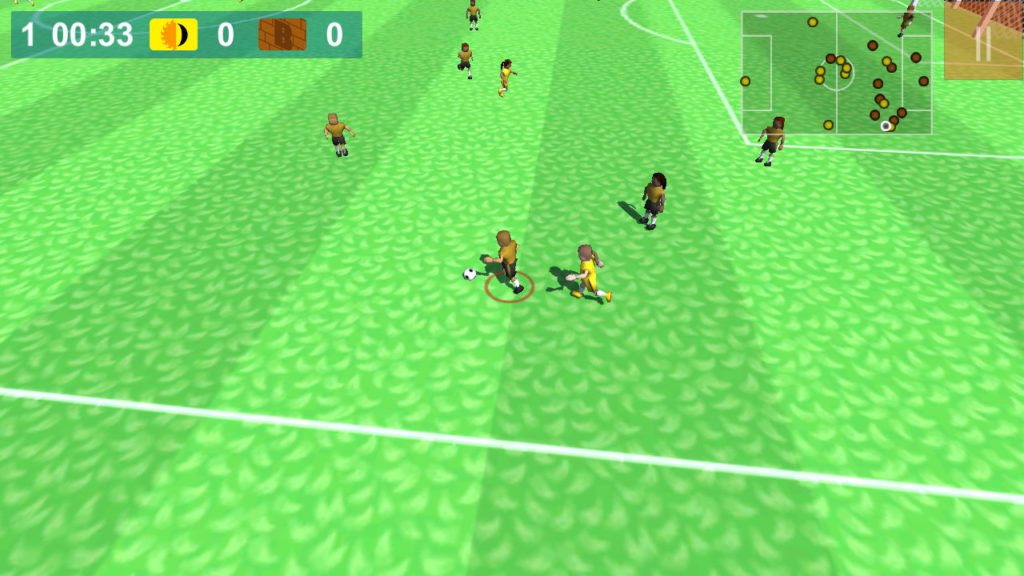
FAQ
PLEASE NOTE:
As stated in the manual, it is recommended that you add new assets outside the SimSoc folder.
Also, instead of editing the default assets, rather make duplicates and edit the duplicates. Keep the duplicates out of the SimSoc folder, and update the relevant references to use the duplicates. So that you do not lose changes when you update the Soccer Kit.
Whenever the steps refer to editing default assets, rather edit the duplicate assets which you made of the default ones (where relevant).
Adding new assets
How do I replace the players with my own Mecanim characters?
How do I add a new team?
How do I add a new field?
Teams/Players
Why does the ball bounce off the goalkeeper’s head when he tries to throw it?
How do I change the team’s name, which is displayed on the UI?
Tournaments
How do I change the names of the tournaments?
Cameras
How do I add a top-down camera?
How do I position the camera on a different side of the field?
Controls/Input
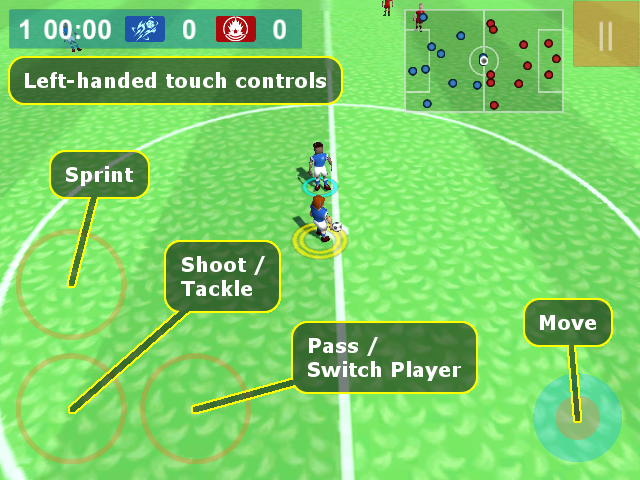
What are the mobile touch controls?
Audio
How do I change the match music?
How do I change the menus music?
Code Samples
How do I check if my team has the ball?
How do I replace the players with my own Mecanim characters?
STEP 1:
You can create a new player prefab and add an SsPlayer component to it, or make a duplicate of an existing player prefab and change its properties.
STEP 2:
Set at least the following properties on the SsPlayer component:
Id – Player’s unique ID (e.g. “blue team goalie”, “jane smith”, “john smith”).
Mesh Child Or Prefab – A reference to the mesh/fbx prefab (or the child if the mesh is already attached to the player as a child).
Position Properties – An array that specifies which positions the player can play (e.g. goalkeeper, forward, midfielder, defender). The player needs at least one position.
Ball Collider – A collider to use for detecting collision with the ball. (The collider should be on a child object.)
STEP 3:
Set at least the following properties on the SsPlayerAnimations component:
Runtime Animator Controller – Reference to the AnimatorController to use for the player.
Animation Properties – An array that links animation names to player states. Example: If your run animation is named “fast_run” then you need to link it to the player’s run state. There are a few additional, optional, properties. Such as which child/bone to attach the ball to when the player holds the ball, or at which time during the animation to release the ball when the player throws it.
STEP 4:
Add at least one SsPlayerSkills component to the player (or to the player’s children). If all the players in the team share the same skills then add the SsPlayerSkills component to the team prefab instead. (The game first checks if the player has skills attached, and if none are attached then it checks if the team has skills attached.)
STEP 5:
Set the relevant properties on the Character Controller component, such as the radius and height.
STEP 6:
Add the player to the team’s Player Prefabs array.
Tip: If your team has more than one player mesh, then you can duplicate the player prefab and set the Mesh Child Or Prefab property to reference the other meshes.
Optional components to add to the player:
SsPlayerSounds – Sound properties and references to clips.
SsPlayerAccessories – Prefabs to attach to the player (e.g. hat, hair).
How do I add a new team?
STEP 1:
Create a new team prefab, or duplicate one of the existing prefabs in the folder:
Assets\SimSoc\Resources\Teams
STEP 2: Creating a new Team prefab
How to create a new team prefab (skip if you duplicated a team prefab):
Create a new empty scene.
Add an empty game object. Position it at 0, 0, 0.
Rename the game object to a descriptive name, e.g. “Chaos Team”.
Add a “Ss Team” component to Chaos Team.
Set the properties on the SsTeam component (see Team Properties below).
Add a child game object to the team and name it Skills.
Add a “Ss Team Skills” component to the Skills game object.
Drag Chaos Team from the scene into the Project tab, into the Resources folder, or a sub folder in the Resources folder (see Prefab Location below). (The Resource Manager will now detect the team and make it available in the game.)
Close the scene, but do not save it.
STEP 3: Team Properties
Set the properties on the team prefab:
Id: Must be a unique string (e.g. “chaos team”).
Team Name, and other optional names (e.g. Preferred Name).
Home Field Id: The ID of the field scene (optional).
Mini Map Colour.
Hud Icon: Texture, Sprite type.
Result Icon: Texture, Sprite type.
Half Time Icon: Texture, Sprite type (optional).
Player Prefabs: Array of player prefabs (see Adding Players below).
Fake Shadow Prefab (optional).
STEP 4: Prefab Location
Make sure the team prefab is in the Resources folder, or a sub folder in the Resources folder. So that the Resource Manager can detect the team, which will make it available to use in the game.
Ideally, keep the team out of the SimSoc folder, so you don’t risk losing it when you update the soccer kit (which updates the SimSoc folder).
Example folder in which you can keep your teams and players:
Assets\Resources\MyTeams\
STEP 5: Adding Players
Create new player prefabs, or duplicate existing player prefabs. See the FAQ for how to replace the players: How do I replace the players with my own Mecanim characters?
Then add the player prefabs to the team’s Player Prefabs property.
STEP 6: Adding the Team to the Team Select menu
Follow these steps if you are using the soccer kit’s default menus (although it is recommended that you make copies of menus and scenes you want to change and edit the copies instead):
Open the scene: Assets\SimSoc\Scenes\UI\MainMenus
Find the Team Select menu (a child of the Main Menus game object).
Enable the Team Select menu. (Disable other menus if they are blocking the view.)
Find the Content game object (a child of the Team Select menu).
You should now see the team buttons (e.g. “1 blue team”, “2 red team”, etc.).
Duplicate the last team button, NOT THE RANDOM BUTTON. Example: The last team button might be “8 purple team” (located just above the random button “9 random”).
Rename the new button (e.g. “9 chaos team”).
Change the button’s Source Image (on the Image component) to point to the team’s logo texture (sprite).
Drag the new button to just above the random button.
Rename the random button (e.g. “10 random”).
Select the Team Select game object.
In the inspector, go to the “Ss Team Select Screen” component.
Expand the Team Buttons array.
Add a new element to the array (e.g. if Size is 9 then change it to 10).
Expand the new element at the bottom of the array.
Drag the new team button into the Button property (e.g. drag “9 chaos team” into the Button property).
Set the Id property to the team Id you specified on the team prefab (e.g. “chaos team”).
Click the Apply button at the top of the inspector.
Save the scene.
STEP 7:
Run the Startup scene and select the team in the menu.
How do I add a new field?
BASIC SCENE SETUP
STEP A1:
Create a new scene, save it, and add it to the build settings.
STEP A2:
Click on the menu item:
Tools\Simple Soccer\Add Field Properties
It will add a Field Properties object to the scene.
STEP A3:
Drag the prefab Spawn Persistent Prefabs into the scene. It is in the “SimSoc\Prefabs” folder.
This prefab will allow you to test the scene in the editor.
STEP A4:
Drag the prefab Debug Match into the scene. It is in the “SimSoc\Prefabs\Match” folder.
This prefab will allow you to test the scene in the editor.
STEP A5:
Drag your stadium meshes into the scene.
STEP A6:
Set your stadium meshes to use the “World” layer.
STEP A7:
Drag your mesh colliders for the stadium into the scene (if you have mesh colliders).
Otherwise, set up simple mesh colliders. If you want your game to run on mobile then it is better to use simple mesh colliders for performance (e.g. box colliders, sphere colliders).
STEP A8:
Set your stadium colliders to use the “World” layer.
FIELD PROPERTIES SETUP
STEP B1:
Expand the Field Properties game object.
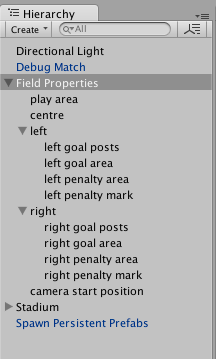
You will see various child game objects:
STEP B2:
Adjust the child game objects to fit your stadium mesh.
Examples of child objects:
play area – This has a box collider that defines the area in which the match will be played. During a match the ball has to stay inside the play area’s collider. Therefore position this object in the centre of the field and make the box collider big enough to fill the field area.
centre – This has a sphere collider that defines the centre of the field and the size of the centre circle. The ball will be positioned at this game object when a match starts. Therefore position this object in the centre of the field and make the sphere collider big enough to fill the centre circle.
left/right – These two objects have children objects for the left and right side of the field.
left/right goal posts – This has a box collider that defines the goal post area. If the ball goes into the box collider then it is a goal.
left/right goal area – This has a box collider that defines the goalkeeper area. The goalkeeper tries to stay inside this area.
left/right penalty area – This has a box collider that defines the penalty area.
left/right penalty mark – This object defines the position of the penalty spot.
STEP B3:
Select the Field Properties game object.
In the Inspector set the relevant properties.
Examples of properties:
Override Num Players – Tick this to override the default number of players per team allowed in the field (e.g. if the field is small and you only want 6 players per team).
Num Players Per Side – The overridden number of players per team.
Goal Bar Width – Width of the goal post bars.
Audio – Some audio settings for the field which include music, ambient sounds and volume.
Slide Tackle Prefab – The prefab particles to use when a player does a slide tackle (e.g. a dry field can have dust particles, while a wet field can have water particles).
Friction Scale – Affects how far players slide/skid. Example: 1 = normal, 0.5 = half normal distance (sticky surface), 2 = double normal distance (ice).
SCENE MANAGER SETUP
STEP C1:
Select the Scene Manager prefab, in the “SimSoc\Prefabs” folder.
STEP C2:
In the Inspector expand the Field Scenes array.
STEP C3:
Increase the Size property by 1.
STEP C4:
Expand the new array element which was added to the bottom of the Field Scenes array.
STEP C5:
Set the new array element’s properties:
Scene Name – Name of the new scene you created. The name must be exactly the same as the name of the scene, which you added to the build settings.
Id – A unique ID for the field. This ID will be used in the code to identify the scene.
Display Name – The name of the field that will be displayed on the UI.
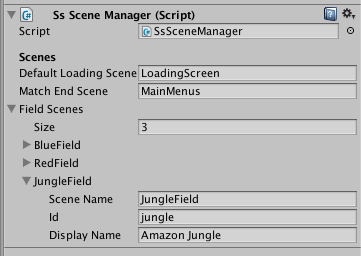
ADDING THE FIELD TO THE UI
STEP D1:
Open the MainMenus scene, in the “SimSoc\Scenes\UI” folder.
STEP D2:
Expand the Main Menus game object.
STEP D3:
Expand the Field Select game object until you find the Content child object.
STEP D4:
Duplicate the last field button, above the random button. Then rename the new button and move it above the random button.
Example: If last field button was “2 red field” then duplicate it and name it “3 jungle field” and move it above the random button.
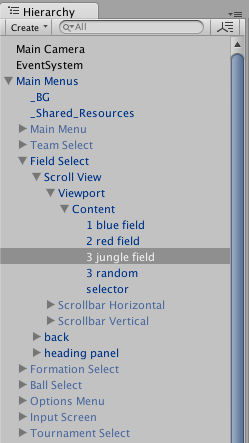
STEP D5:
Select the new field button and set its Source Image to reference a 2D texture for the field (e.g. texture can be the field logo or a screenshot of the field).
STEP D6:
Select the Field Select game object.
STEP D7:
In the Inspector expand the Field Buttons array.
STEP D8:
Increase the Size property by 1.
STEP D9:
Expand the new array element which was added to the bottom of the Field Buttons array.
STEP D10:
Set the new array element’s properties:
Button – Drag the new button into this property.
Id – The field’s ID. The same as the ID you setup in the Scene Manager.
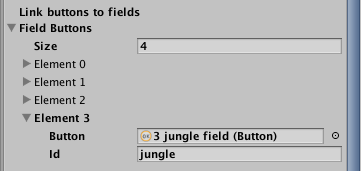
TESTING THE NEW FIELD
STEP E1:
Open and run the Startup scene.
STEP E2:
Click the Play button to go to the Team Select screen.
STEP E3:
Click the Field button to go to the Field Select screen.
STEP E4:
Click the new field’s button to select the field.
STEP E5:
Click the Back button to return to the Team Select screen.
STEP E6:
Select a team, or click the Next button to start the match.
Why does the ball bounce off the goalkeeper’s head when he tries to throw it?
Make sure you setup the Layer Collision Matrix as described in the manual.
How do I change the team’s name, which is displayed on the UI?
STEP 1:
Select the relevant team prefab in one of the team folders: SimSoc\Resources\Teams
Example: The red team prefab is in the folder: SimSoc\Resources\Teams\Red Team
STEP 2:
Change the Team Name property on the prefab.
You can also change these properties if you want to use them on your own UI:
Preferred Name
Short Name
Name 3 Letters
How do I change the names of the tournaments?
STEP 1:
Select the Match Settings prefab in the folder:
SimSoc\Prefabs\Match
STEP 2:
Expand the Tournament Settings array.
STEP 3:
Change Display Name for each tournament.
How do I add a top-down camera?
STEP 1:
Select the Match Prefabs prefab in the folder: SimSoc\Prefabs\Match
STEP 2:
Set the Match Camera property to use the prefab Match Camera – Top Down. The prefab is in the folder: SimSoc\Prefabs\Match
There are also additional cameras in the folder: SimSoc\Prefabs\Match\Extra Cameras
How do I position the camera on a different side of the field?
STEP 1:
Select the Match Prefabs prefab in the folder: SimSoc\Prefabs\Match
STEP 2:
Set the Match Camera property to the relevant camera prefab. The camera prefabs are in the folder: SimSoc\Prefabs\Match\Extra Cameras
Example camera prefabs:
Match Camera (Play Left): Camera looks down the negative Z axis.
Match Camera (Play Down): Camera looks down the negative X axis.
Match Camera (Play Up): Camera looks down the positive X axis.
What are the mobile touch controls?
Right-handed:
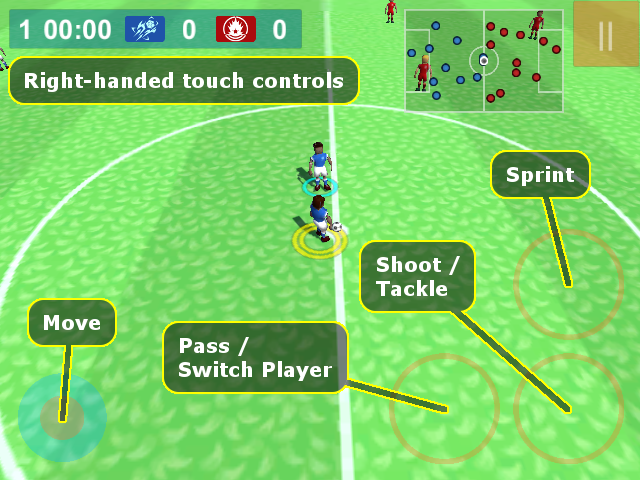
Left-handed:
How do I change the match music?
STEP 1:
Select the Match Prefabs prefab in the folder: SimSoc\Prefabs\Match
STEP 2:
Set the Music property to the audio clip you want to use.
Please note:
The above steps will set the default music to use in all the matches, but each field (stadium) can override the default music (see below).
It is recommended that you un-tick Preload Audio Data on the default music clip. So that it does not preload it when you override it (i.e. it will not preload the default music AND the new music you overrode it with, when the field scene loads).
How to override the default music: In the field scene, select the Field Properties object and set the Music property.
How do I change the menus music?
STEP 1:
Select the Main Menus Music prefab in the folder: SimSoc\Prefabs\UI
STEP 2:
Set the Clips property to the audio clip(s) you want to use.
How do I check if my team has the ball?
if (SsMatch.Instance != null)
{
	if (SsMatch.Instance.BallPlayer != null &&
		SsMatch.Instance.BallPlayer.Team != null)
	{
		// A player has the ball
		if (SsMatch.Instance.BallPlayer.Team.IsUserControlled)
		{
			// My team has the ball
		}
		else
		{
			// Opponent team has the ball
		}
	}
	else
	{
		// Nobody has the ball
	}
}